
Custom Hood Ornament Project
While testing out some different options for grille lights to put behind the grate of the grille on our of our custom carts, we were
We often get asked “How do I align/arrange my wheel lights?” and that might encompass a few things.
For starters, sometimes the question is asked in reference to how to align the small clamps that attach to the LED wheel light rings. Supplied in each of our exclusive 11″ or smaller golf cart and ATV sets are 3 clamps for each wheel ring. Our larger LED wheel light sets for cars, trucks and monster golf carts are supplied with 5 clamps for each ring. Each clamp slips over the wheel light ring and attached light strip at the squared off end and fastens with one of the supplied hex screws. Once tight the other end extends inward to attach to a fixed point for mounting. Our mounting kits come with brackets that extend the clamps further inward to attach to an axle post or inward and back to attach to the axle or other surfaces further in.
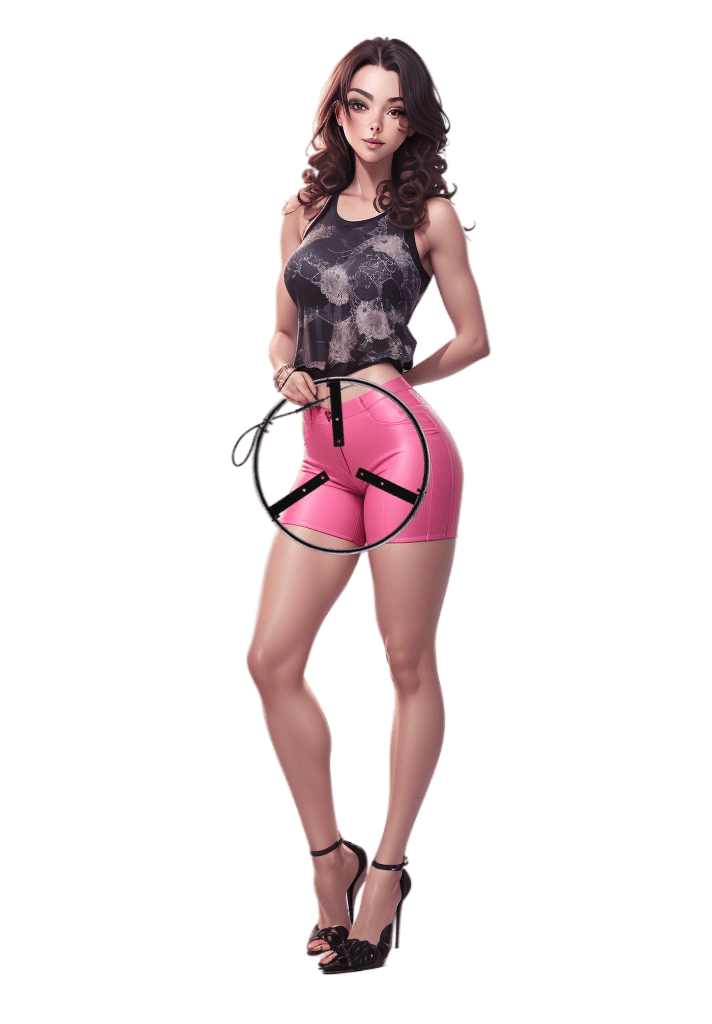
We suggest arranging the three clamps roughly equidistant around the perimeter of the wheel hoop in a shape similar to a “peace” sign as shown in the image to the right. The clamps do not have to be perfectly spaced and can be slid in either direction to avoid obstacles. The goal is just three reasonably spaced attachment points once installed.
Another orientation need to keep in mind if you plan to wire up the turn signal functionality, make sure the two wheel hoops marked as “left” are installed on side of the cart that is on your left when seated facing forward and that the hoops marked “right” are installed on the other side.
And yet another consideration is the placement of the wires leading to each wheel hoop. Most times it makes sense to mount the hoops so the wires in the same relative position for each wheel. We suggest at “12 o’clock” to help keep the wires as high and out of the way at possible. Regardless of where you choose to locate the wires, you will probably want to do it consistently for all wheels assuming you want the dynamic patters to all start in the same place and mirror each other across all the wheels.
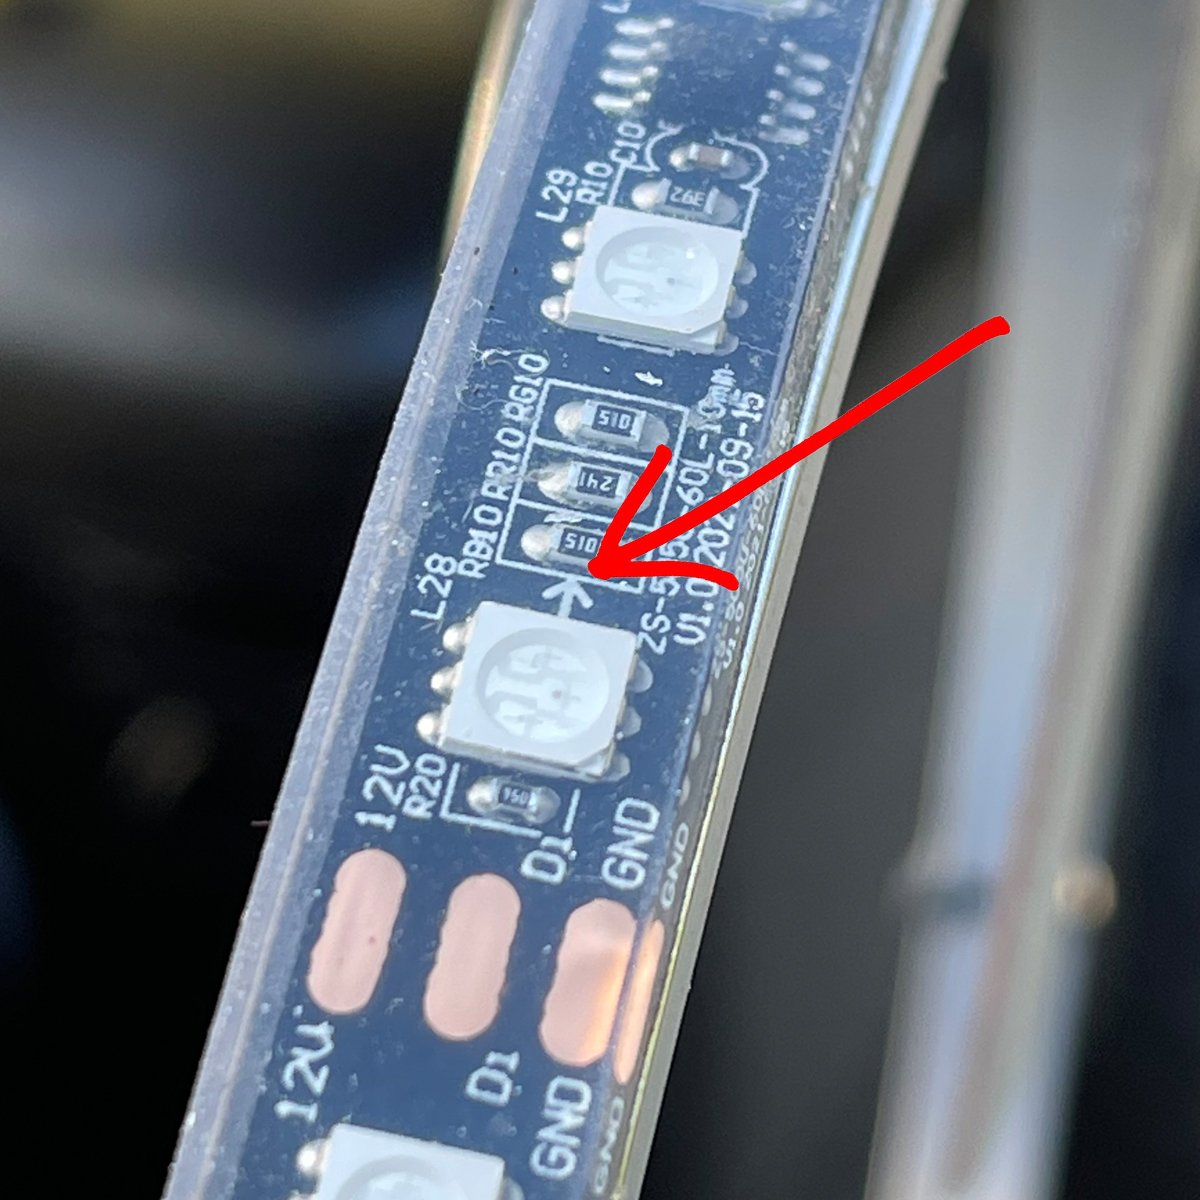
And finally, thought should be given to the “flow” capability of the lights. Our signature wheel lights have patterns that “move” directionally. The strips on each wheel hoop are marked with small arrows that show the direction of normal “forward” movement of light patterns. “Reverse” patterns with flow in the opposite direction. It isn’t imperative that the arrows face the front or rear of the cart. You can decide whether forward patterns chase clockwise or counterclockwise for each wheel. Most of our customers orient all four wheels to spin in the same direction (clockwise or counterclockwise). However, we have seen installations where the front wheels spin toward or away from each other for a cool effect too. Just note the arrows so you don’t end up with an unintended mix of chase directions.
Each Dazzle Ride LED whip set comes with two sample whip flags and the hardware to attach the flags to the whips columns. Keep in mind you can also custom order flags for your LED whips with any design of your choosing or creation here!
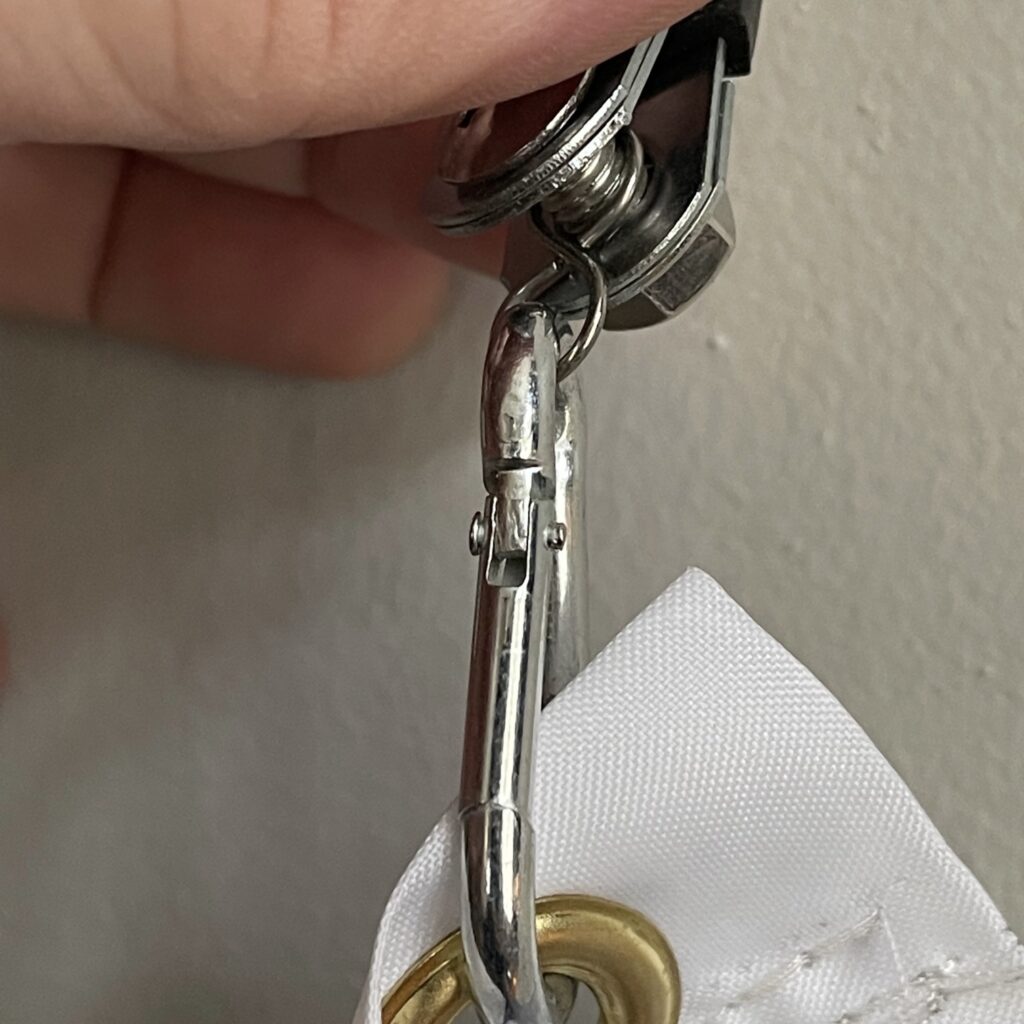
To install flags, simply spread the provided metal brackets (with rubber coverings) open and push into place around a whip at the top positioning each attachment bracket about where you want the grommets of the flag to be located after installation. Use one of the small bolts to pass through one side of the bracket, then insert the bolt through one of the small figure 8 attachment pieces and finally have the bolt exit the other side of the bracket. Secure with a nut.
The other side of the figure 8 attachment wire is threaded onto the snap ring. And each of the snap rings attaches through a grommet hole on the flag.
See pic below:
Each strip of lights has arrows denoting the direction of “forward” “flow” for light patterns from that app that flow in a “forward” direction. Keep in mind the app will also offer “reverse” patterns. The arrows are helpful for orientating things during installation. For instance if you want “forward” flow patterns for your underglow kit to start at the front of your cart and flow strip to strip to the rear of the cart, arrange all the strips so that the arrows point toward the back of the cart. There is no right and wrong way of doing it of course. There are almost an equal number of “reverse” patterns and “forward” patterns. When installing wheel lights the arrows can help you make sure that the wheels all chase in the same direction (if that is what you prefer) or in opposing directions (if that is the look you are after).
We often get asked, “How do you wire one of the 5-pin rocker switches?” While there can be some variations according to how you want the backlights to function (primarily), the most typical wiring for this type of switch looks like this:
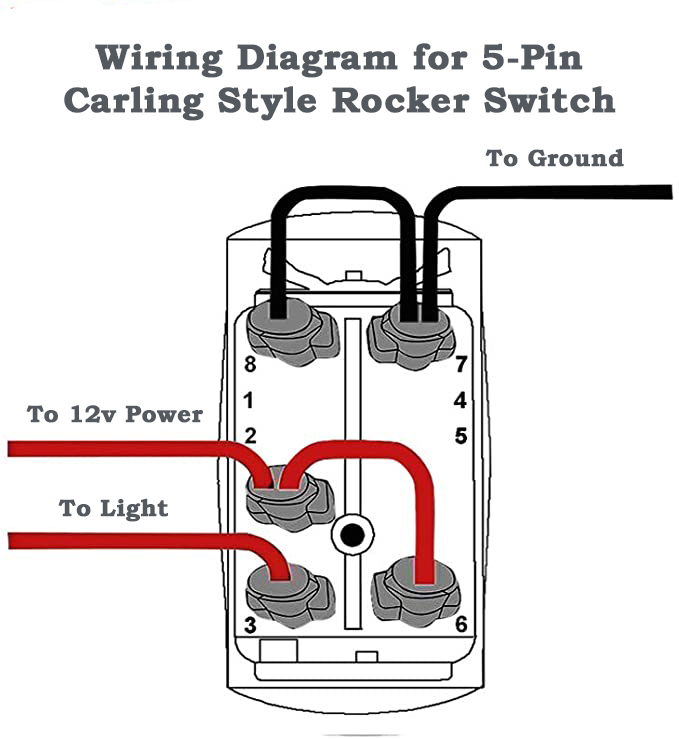
The two ground terminals are jumped together and connected to ground. The two power inputs are also jumped together and connected to a 12v feed. The final wire (#3 above) is routed to the light or accessory the switch will control.
There are other variations, (where the switch identification (top) light illuminates when the headlights are switched on, for example), depending on your preference for when the top and bottom buttons will illuminate.
*Please don’t attempt to install any electrical components or devices if you are not certain of the proper installation; seek out the assistance of an experienced professional installer.
If you are asking, then it is probably your first time. And if you’ve never done it before, it will likely take a couple of hours. Each wheel will need to be removed, and each wheel ring fixed well to some attachment points. The controller will need to be placed and wire from it to the 12v power supply. Wires from the controller to each of the wheels will need to be run under the cart and attached and secured to the underside out of sight and harms way and ultimately connected to each wheel ring’s light strip connector. It is easier than it sounds, but it does take time to run the wires and mount the rings properly.
It is likely that the controller hasn’t properly synced up. Set the power setting in the app to off and then disconnect the lights from power for 30 seconds. Re-connect power. Go into the app. Turn on the power button there. Go to the products section of the app. Tap the icon in the upper left corner of the app. A list of all of your connected LED light products will appear from the left. Make sure that the light set you are reviewing is connected. It should have a check mark to the left of it. If you see a broken connection symbol next to your light set, tap the icon to connect it. Once connected, go to the “Mode” screen (tap the center icon at the bottom of the app). The preset pattern that is currently selected will be shown in the dark shaded area. Slide up or down to select another preset and your lights should change to that pattern.
If you are in any way not 100% certain how to install something, let a certified professional install it for you. Improper installation can result in damage to the item you are installing itself, result in other damage or can result in serious injury or even death. If you aren’t able to locate an installer near you, give us a call and we may be able to recommend one. Before we began offering our products to the public, we sold exclusively to dealers are repair shops. We have hundreds that we have done business with and may be able to recommend one in your area.
First of all, in order to best see the lights, your cart should have rims with spaces that can be seen through; otherwise the effect will be limited to throwing light up into the wheel wells and down on the ground. Generally speaking, carts with standard sized factory wheels may benefit from the 8″ kits while carts that have been modified with larger tires and rims common with lifted carts may be better suited for the 11″ kits. Place a ruler or measuring tape in front of one your wheels and note the widest diameter that will be visible through the rim once installed. For maximum effect, avoid the lights ending up too much behind the tire(s). For a more subtle effect, position the lights a bit more behind the tire(s).
The “best” way of installing golf cart LED roof lights depends on your preferences and your particular golf cart’s roof. Roof lights near the outer edge of your golf cart’s roof can create some great looks. And there’s no right or wrong way to go about it (although we have a strong preference that the LED strips can NEVER be seen). But installing the lights (and hiding them if that’s your preference too) can present some challenges. For lights that can chase, wires can be run left and right so that chasing mirrors along each side or configured to chase around the entire cart in one direction. In either case we recommend running the wiring up one or both of the front roof support bars and then out near a corner.
High quality strips have adhesive strong enough to adhere to any flat surface (like a metal rail) and the adhesive on ours is actually so strong it is difficult to remove the strips without breaking them once installed. However, our preference is to NOT mound strips externally to anything where they are visible. We see it a lot and we have IP67 strips that can run literally underwater, but we prefer the strips to be invisible when not in use. For that reason we offer a number of different types of channel products and diffusers. For roofs like the 2 and 3 rounded track models of some popular aftermarket part companies, we have standard sizes of LED tubing with diffusers that fit them. You simply run the strips into the tubing and the tubing into the track. When the lights are off all that can be seen is black or white (your choice) diffuser lens facing downward from the channel. When the lights are switched on, the light effects are bright and visible illuminating the entire downside of the channels and tubes bending the corners.
A few carts like some popular OEMs have sideways facing rectangular metal tracks. Sideways is fine (the LED strips run sideways in the round tubes so that they can bend the corners), but these tracks often have a couple of bolts all the way through them (for the roof supports) blocking your ability to run the strips neatly in the track all the way around. Some solutions we’ve seen include using separate strips before and after the bolts with wires coming up both the front and back roof supports to achieve it with two sets of lights. Another approach is to simply come out of the track (exposing some strip briefly), up and over the support, and then back into that track. But that violates are no strip visibility preference. So we found some hardware that allows the roof to attach only to the outside back of those tracks leaving room for strips. You can check them out here. And finally, we of course have some diffuser cover we’ve made to fit these tracks to the little LEDs can’t be seen when the lights are off.
We’ve also messed around with a few laser devices that project lights in motion all over the roof, fiber optic sets that create starry sky looks, and other applications, but that’s another topic unto itself.
Most of our products are water proof and we try our best to list the manufacturers’ listed ratings. In the rare case that we discover a product does not perform exactly as claimed, we remove it from our offerings. The LED light strips used in most of our products are either IP67 or IP68 water proof. While we are authorized distributors for many popular lines of audio and other electronic products (and can special order anything that any of our manufacturers carry upon request), we limit the products on the Dazzle Ride shop to products particularly suited for golf carts, ATVs and other smaller vehicles. Consequently, we tend to list primarily smaller profile marine grade audio products and lights and other accessories that can stand up to exposure to the elements.
The specific ones we carry, we had custom made to match lights we couldn’t find type specific switch covers already available for. Similar switch covers are available from a number of sources for generic things like “Lights”, “Accessories”, “Aux”, etc. We have even seen one already out there for “Whip Lights” so haven’t re-done one of our own for that (yet). If there is enough demand for one we may have overlooked, we’ll create one, have it made and stock it. So, always let us know if there is something you “wish” we had too.
Our Signature controllers and lights are coded with a Unique ID to work together. In additional to that, each product’s ideal controller voltages are tailored/matched to each specific product. It is highly unlikely that a Dazzle Ride controller will work with other LED lights from another source due to the unique ID coding, and it is not recommended to connect lights from one Dazzle Ride product set to a controller from another product set. The controller voltage may be too low for the different product to operate properly, or worse, too high and damage could result.
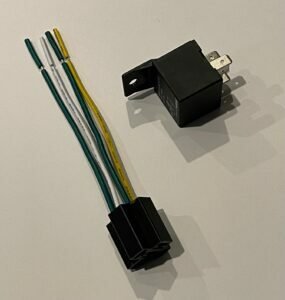
Yes, if your ignition is 12v. If you have one of our golf cart GPS trackers installed in your cart, you may notice that there are commands to disable and re-enable your vehicle. You can use a relay accessory to facilitate using these commands. The relay essentially works as a remote kill cutting power to the ignition (as long as the vehicle is traveling under 15mph as an added safety measure). However, the power to/from your ignition must by in the 12-24v range.
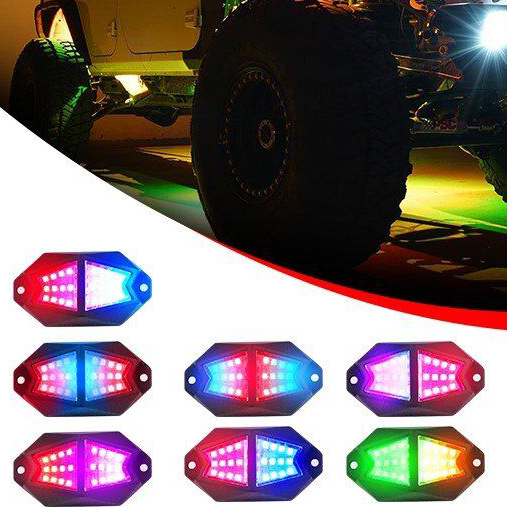
Our Signature rock lights do indeed create a chasing effect similar to LED underglow strips. They achieve this through a unique design incorporating 24 LEDs across the face of each pod. Each pod has two sides that are angled slightly away from each other and each side as 3 rows/4 columns of LEDs. Each column can display it’s own unique changing color. As a pattern travels from light to light, changes in color literally enter one side of the light, travel across and exit the other side moving on to the next light. Any single pod can be displaying multiple moving colors at an moment in time. The distance between lights is factored for and the varied angles of each light throw the light outward in arcs. The net effect is that dynamic patterns with moving colors can be seen to chase in the light thrown away from each light and from light to light, simulating an effect similar to that of an LED strip.
We’ve spent many years upgrading golf carts. And a large share of the compliments and requests we receive center around electronics, lights and other gadgets. Good sources for upgrade body kits, seats, lift kits, wheels and tires and other standard vehicle component upgrades are fairly easy to find already. But a few of the specialty electronic things are just sort of sprinkled in, subject to a lot of variety of quality and function, sometimes confusing, and usually not very coordinated to each other.
Adding LED lights in particular, tended to not go much beyond: buy any cheap string or two, stick or zip tie them on to something and hope they last more than a week or two. If you wanted them for more than one function, they were most likely going to be from two different sources. And heaven forbid you hoped they’d match or play nicely together, be reasonably bright, or last.
That was never going to be good enough for us, and before our first install we did a ton of research on what works, what lasts, and how best to install. And over the years we’ve refined our understanding and our collection to a point where we think we’ve found about the best solutions available and created some things to enhance and compliment combining and installing them. We’ve curated a small collection of items that look stunning, function really well and coordinate with each other.
Our Signature Lights Collection is a collection of LED light products that we’ve assembled to be of high quality in function and durability and compatible with each other. Each product was selected for best in class features and durability, including being water-proof and dust-proof. We then paired them with a controller that offers superior features, incredible light display options including some amazing chase patterns, both bluetooth and remote options, and superior stability. The controller will remember your last selection between uses of your vehicle if you want to set it and forget it, it connects seamlessly and reliably when you want to change something up, it has a random “surprise me” function, it supports brake and turn signal functions and best of all, you can add all of our other Signature Lights Collection products in our one app and “group” any or all of them to run the same patterns in unison.
Most other controllers don’t support many of these functions, never mind all of them. Many if not most can’t even be paired with each other. The Signature Lights Collection is a family high quality, superior performing LED products that can be combined with each other to create amazing combinations of “dazzling” coordinated effects and themed looks for your golf cart, ATV, UTV, car, truck, boat or other vehicle.
The larger voltage converter is appropriate for supplying 12v DC to several 12v accessories. We recommend using it with one of our fuse boxes. The smaller converters are better suited to converting a single feed for a single purpose. For example, maybe your turn signals operate at a full 48v but you want to use a feed for when they are active to trigger your right side and left side wheel lights to flash amber along with them. The smaller individual converters are ideal for that.
Before purchasing any product from our shop, each unique visitor/purchaser is required to acknowledge our Terms and Conditions which contain the return and shipping policies and more before a sales transaction in the cart will be allowed to proceed. The Terms and Conditions can referred to at any time by accessing the cart (without need to complete a purchase) but can also be viewed directly here: https://dazzleride.com/returns_and_refunds_policy/
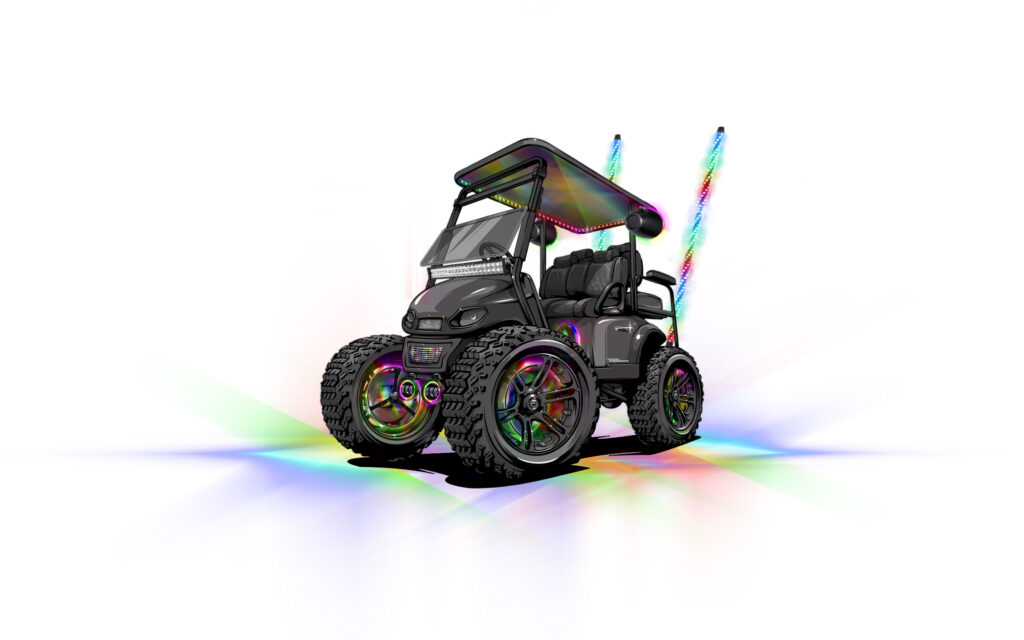
“Honey Badger” was the name given to one of our family golf carts by our kids years ago. The kids weren’t allowed to use certain “colorful” language but the inside story was that everyone knows Honey Badger is a bad-@$$!
The name stuck and when we used the cart to model one of our logos after, the Honey Badger cart image became synonymous with Dazzle Ride.
One of our current carts was built out with a similar look but includes our own honey badger logo embroidered on the custom seats, a honey badger hood ornament, a custom honey badger grille plate, honey badgers logos on both the steering wheel center cap and the wheel caps, features many of our signature lights and is affectionately called ,”Honey Badger 2.0″. The logo has been updated with the new features to match the real cart.
The majority of underbody kits that have been widely available tend to come with sets of strips of predetermined lengths that are “chained” to each other, one group intended for each side of a vehicle.

A lot of them are junk, but a few use decent quality strips. After installing the better version of these for long enough and being constantly frustrated with each strip still not always being the best length and the cables joining one strip to the next inevitably being to long or too short, and in generally not easily being able to place strips of the lengths we wanted where we wanted, we decided to start ordering controllers with separate wires to each individual strip. Problem(s) solved. We can now easily cut any or all of the strips (at the appropriate cut marks) to fit our needs without a crazy amount of work to try to then re-waterproof and re-create the connection to the next strip. Wires are always long enough and much easier to either hide extra or cut and solder. And if someone decides they want this cart to chase from front to middle and from back to middle (for example) it’s not only possible when it wasn’t, it’s easy. Any strip can go anywhere, at any length and flow in any direction desired. The number one comment we get from installers is that our kits are so much better and easier to install than what they are used to. We hear that more than twice as much as any other feedback.

While testing out some different options for grille lights to put behind the grate of the grille on our of our custom carts, we were

https://dazzleride.com/wp-content/uploads/2023/02/RoofPulsingChasing.mp4 Two of the most frequently asked question groups we get are on installing wheel lights and installing roof lights. Maybe the reason it comes
As the New Year approached we were taking stock (both literally and figuratively) and doing a lot of thinking about the coming year. And at
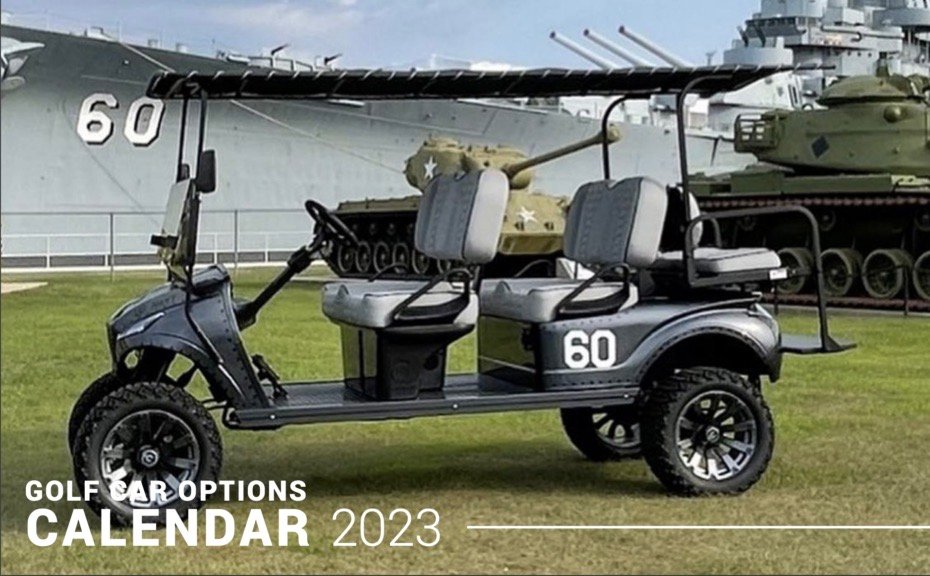
One of our Dazzle Ride builds will be featured… We are proud and pleased to have one of our Dazzle Ride cart builds chosen to
Copyright © 2023 Dazzle Ride, LLC. All rights reserved.
| Cookie | Duration | Description |
|---|---|---|
| cookielawinfo-checkbox-analytics | 11 months | This cookie is set by GDPR Cookie Consent plugin. The cookie is used to store the user consent for the cookies in the category "Analytics". |
| cookielawinfo-checkbox-functional | 11 months | The cookie is set by GDPR cookie consent to record the user consent for the cookies in the category "Functional". |
| cookielawinfo-checkbox-necessary | 11 months | This cookie is set by GDPR Cookie Consent plugin. The cookies is used to store the user consent for the cookies in the category "Necessary". |
| cookielawinfo-checkbox-others | 11 months | This cookie is set by GDPR Cookie Consent plugin. The cookie is used to store the user consent for the cookies in the category "Other. |
| cookielawinfo-checkbox-performance | 11 months | This cookie is set by GDPR Cookie Consent plugin. The cookie is used to store the user consent for the cookies in the category "Performance". |
| viewed_cookie_policy | 11 months | The cookie is set by the GDPR Cookie Consent plugin and is used to store whether or not user has consented to the use of cookies. It does not store any personal data. |